Click to watch the video
Remote Device Updating
There are two ways you can move your files from your computer to Video Kiosk:
- Connect your Android device to your computer with USB cable and copy them over using the Android File Transfer app (see the Android File Transfer Tutorial)
- Have Video Kiosk download the files automatically using the Cloud Update feature.
Video Kiosk’s integrated Cloud Update feature allows you remotely update both the media that will be played as well as Video Kiosk’s Configurations files using either Google Drive or Nextcloud as your cloud service.
Alternatively, you can use third-party cloud download App like Autosync Dropbox or Autosync Google Drive. The process of configuring a third-party cloud download App would be similar to the procedures below. However, we do not provide support for configuring third-party downloading Apps and recommend you use the integrated services.
How to remotely update Video Kiosk Content
Using the built-in Cloud Drive Download service (or a third-party Cloud download App), you can remotely update the content and the control files that will be used by Video Kiosk on devices.
To set up the remote updating, you need to do the following:
- Create a New videokiosk folder (or move your existing one) to your .
- If you haven’t already done so, create a videokiosk folder on your Android device
- Update the Video Kiosk settings with the Cloud videokiosk Folder location and the device’s videokiosk folder location.
To update the Content Folder on the device(s), just move the files you want to update to the videokiosk Folder on your Cloud Service and the cloud service will update each device with the new files.
How to Configure and Use Cloud Drive Update
click image to enlarge
Internet Access is required on your Android device to configure and use Cloud Drive Update.
To set up the Cloud Drive Update feature, follow these steps:
- Create a videokiosk folder on your Cloud Drive (Source Folder).
e.g. Google Drive > Video Kiosks > Phone Video Kiosk > videokiosk
(Management Hint: On your computer or cloud drive, put your videokiosk folder inside another folder with a meaningful name to help identify it, especially if you’re running more than one Video Kiosk.) - On each Android device, configure the settings with the Cloud Source Folder location.
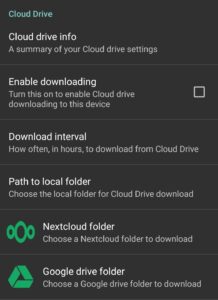
Video Kiosk > Settings > Cloud Drive > Google Drive folder
OR
Video Kiosk > Settings > Cloud Drive > Nextcloud folderUse the file navigation to select Cloud Source Folder. It will be displayed as the Current folder at the top of the screen (For this example, “Current folder: videokiosk”)
Tap “Choose” - If you haven’t already done so, create a local videokiosk folder on each Android device (Target Folder).
Launch Video Kiosk
Video Kiosk > Settings > Cloud Drive >Path to local folder
From the Ellipse menu ( ), select “Create Folder”
Enter the folder name and tap “Confirm” - On each Android device, Configure the settings with the device’s target videokiosk Folder location.
Video Kiosk > Settings > Cloud Drive > Path to Local folder
Use the file navigation to select Cloud Source Folder. It will be displayed at the top of the screen (For this example, “/storage/…/videokiosk”)
Tap “Confirm” - Optionally, change the Download Interval.
Default is every 1 hour.Video Kiosk > Settings > Cloud Drive >Download Interval - Before you enable downloading, verify your settings. Verify that the Source and Target locations are correct.
Video Kiosk > Settings > Cloud Drive > Cloud drive info
To return to the previous screen, press OK. - Enable Downloading.Video Kiosk > Settings > Cloud Drive > Enable downloading
To download to the device(s), just move the files you want to update to the videokiosk folder on your Cloud Service.
Video Kiosk will check for updates on the Cloud Service periodically, as set in the Download Interval Setting (Video Kiosk > Settings > Cloud Drive > Download interval) and update the devices with the updates you have made, as scheduled.
If you want to download right now, tap the Video Kiosk screen. Download will begin immediately.
Please note that this feature will download from the Cloud source folder to the device(s) content folder, but not the reverse.
For example,
- If you add an image to the source content folder on the cloud service, the content folder on all the devices will be updated with the image.
- However, if you add an image to the content folder on one of the devices, that change will not be propagated to the Source content folder on the cloud service or to any of the other devices. Instead the locally created image file will be deleted the next time the devices are updated with the contents of the Cloud source Folder.
Ensure that you always update the content in the Cloud source folder, not the local folder on a device.
How to remotely manage Video Kiosk schedule, overlays, password files
You can also remotely update Video Kiosk’s configuration files using the Cloud Update feature. Just follow these steps:
- Set up Cloud Drive Download following the instructions above.
- Move any of the configuration files to the appropriate location in for Cloud Drive videokiosk folder. For more information on the location, refer to the videokiosk folder layout information in the Installing Video Kiosk tutorial.
Take the Next Step
Free Trial
Install the FREE trial
Video Kiosk Help
- Read the FAQ
- Read the Purchase FAQ
- Refer to the Tutorials
- Go to the Questions Forum
- Read the Video Kiosk User’s Manual
- If you have any questions, Contact Support


