
Video Kiosk supports Interactive Kiosk Mode, which turns your device into an interactive touchscreen or mouse-controlled kiosk, displaying web URLs or Apps.
Understanding Interactive Hotspots
A hotspot is a rectangle somewhere on the screen or a key code and its associated URL | App that is used to control interaction behavior.
When the hotspot is activated,
- the URL will be displayed using the integrated kiosk web view or
- the App will be launched as a new activity on top of Video Kiosk. (The URL can point to a file on the device or a file on the Internet).
How are Hotspots Activated?
Hotspots are activated either by a screen touch or by pressing the key associated with a pre-assigned keycode on the keyboard or remote control. The area of the screen to touch or the key to press is defined in the Hotspot.xml file.
A key code is the Android key code that corresponds with an individual key on an input device. When the key on the device that corresponds to the Android key code is touched, the URL will be displayed using the integrated kiosk web view or the App will be launched as a new activity on top of Video Kiosk. For more information, refer to the “Controlling the Device” section of the Video Kiosk Users Manual
How to turn your device into an interactive kiosk
- Create an overlay file.
- Create a Hotspot File using the instructions below.
- Once you’ve created the Hotspot File, test the hotspots to ensure they are behaving as expected. For more information, see the instructions below.
- Lock down the interactive kiosk to prevent the user from overriding the content you wish to display. For more information, refer to [Enhanced Access Management Set Up in the Video Kiosk Android Users Manual]
How to Define Hotspots using an overlay xml Hotspot file
Define each hotspot and its associated web URL or App package name using an overlay file (which displays the hotspots to the user) and an overlay hotspot xml file (which tells Video Kiosk what to do when a particular hotspot is activated).
To use hotspots, follow these steps:
- If you haven’t already done so, create an overlay file
- In a Text Editor, create an XML Hotspot file and use it to control interaction behavior. When you have finished editing the file, change the file name to the same name as your overlay file and change the extension to “.xml” so Video Kiosk will recognize it as the hotspot file that goes with the overlay file.
For example, if your overlay file is called “videokiosk.overlay.png”, name your XML hotspot overlay file, “videokiosk.overlay.png.xml”.
For more information about the xml file syntax, refer to the Video Kiosk XML Hotspot File Syntax Guide below - Move the XML hotspot file onto the device. Put the XML hotspot file in the same folder as the Overlay file so that Video Kiosk will find it automatically.
- Optionally, configure the timeout for the WebView in Video Kiosk. If a user of an interactive device leaves while the device is still displaying web content, Video Kiosk will return to your content after 30 seconds. To increase or decrease this wait time, go to Video Kiosk Settings > Overlay > Web Activity timeout and change the timeout (in seconds). For more detailed information about using this setting, refer to [Configuring the Settings ].
- Optionally, configure the Hide overlay option, which controls what will happen to the overlay if the screen is not touched for more than 15 second. Set this, go to Video Kiosk Settings > Overlay > Hide overly. For more detailed information about using this setting, refer to [Configuring the Settings ].
- Optionally, disable WebView navigation.
Note: If you disable WebView navigation, you are responsible for building navigation into your web page(s), including invoking the method window.VideoKiosk.closeWebView(); to return to Video Kiosk’s media loop playback. For more detailed information about using this setting, refer to [Configuring the Settings ]. - If you are using Video Kiosk in Split Screen mode and have configured the XML file to use the <widgetarea></widgetarea> tag, then configure the URL | App and interaction key for each App Widget that you add to each Widget Area. If you don’t configure those items in the Widget Area configuration, Video Kiosk will use the configuration from the XML file.
Video Kiosk XML Hotspot file Syntax Guide
| <hotspots> </hotspots> | A list of hotspots | |||
| <hotspot> </hotspot> | A single hotspot. To be active, each hotspot requires a destination url or app is specified and that an activating rectangle and/or key code is specified. | |||
| <url> </url> | Destination web URL used for a single hotspot | |||
| <app> </app> | Destination App bundle identifier used for a single hotspot. The special value builtin.wifi will open a built-in WIFI configuration Activity. | |||
| <command> </command> | A hotspot command can be one of the following: pause – playback will pause resume – playback will resume nextfile – go to the next file previousfile – go to the previous file nextfolder – go to the next folder previousfolder – go to the previous folder | |||
| <depth> </depth> | When using the commands nextfolder and previousfolder commands, this integer value limits how many folders deep to look. This allows you to control whether sub-folders are considered next or previous folders. Valid Values: 0 – next is next folder at same folder level 1 – Next folder is next sub-folder inside the folder 2 – Next folder is next sub-folder inside the sub-folder | |||
| <widgetarea> </widgetarea> | Look at the specified Widget Area (B | C | D) for the url, app, and interaction key. The values will be selected based on the current widget being displayed in the Widget Area. If values are found in the Widget configuration, use them. Oherwise use the ones specified in this file. | |||
| <keycode> </keycode> | The Android key code, used to activate a hotspot using a keyboard | |||
| <rect> </rect> | The screen rectangle for the hotspot defined using numbers between 0 and 1 as a fraction of the screen | |||
| <top> </top> | Rectangle top | |||
| <left> </left> | Rectangle left | |||
| <bottom> </bottom> | Rectangle bottom | |||
| <right> </right> | Rectangle right | |||
| <interactionkey> </interactionkey> | (Optional) A string that identifies the hotspot. If this tag is set, the interactions for the hotspot will be counted and reported. If this tag is not set, the interactions for the hotspot will not be counted. | |||
| <password> </password> | (Optional) A SHA 512 encoding of the password that must be entered to access this APP or URL | |||
| <pinned> </pinned> | (Optional) A boolean that determines if Video Kiosk tries to keep the launched App pinned. The default value is false. On Android 9 setting the value to true has no effect because Android v9 requires a new task which will result in the display unpinning. |
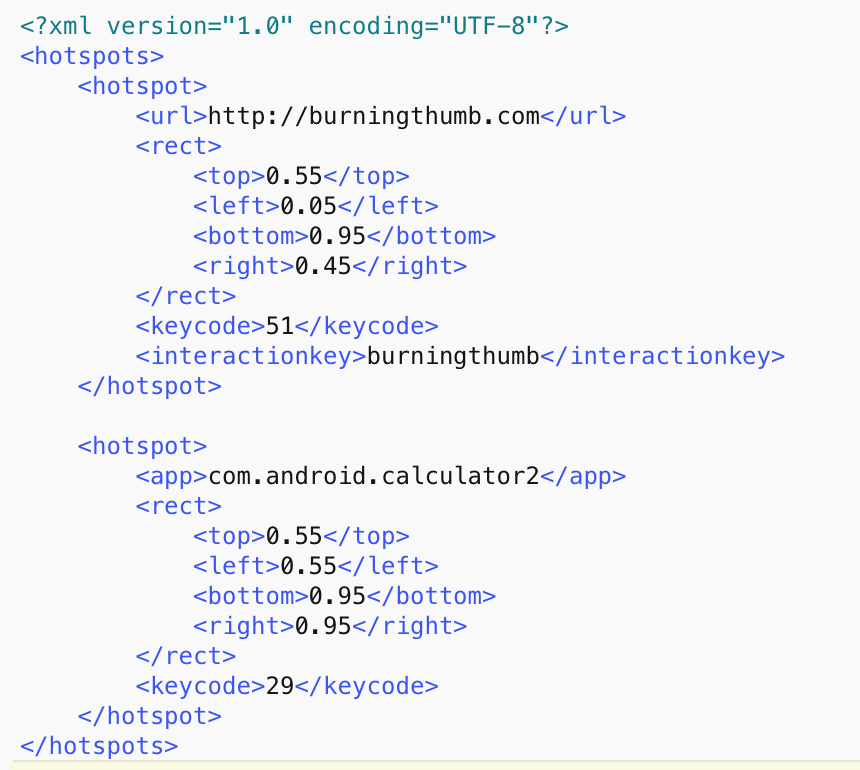
Hotspot .xml file example
Here is an example of what a file that contains 2 hotspots could look like.
- The first hotspot’s destination is the URL “https://burningthumb.com”. It can be triggered by touching the hotspot rectangle or by pressing the key corresponding to key code 51. The interactions to this hotspot are counted and reported in the Management Report with the identifying string of “burningthumb”.
- The second hotspot’s destination is the App “Calculator2”. It can be triggered by touching the hotspot rectangle or by pressing the key corresponding to key code 29. The interactions to this hotspot are neither counted nor reported in the Management Report.

click to enlarge
Hotspot Interaction Tracking
Video kiosk can track interactions with hotspots. If you want Video Kiosk to track interactions, specify an interaction key in the Hotspot.xml file. To report on interactions, enable interaction reporting on the Video Kiosk management interface.
If you are using Video Kiosk in split screen mode, you can specify the interaction key for each App Widget. Video Kiosk will first look at App Widgets configuration, and use any values found there while falling back to the XML file configuration if nothing was specified for the App Widget.
Hotspot .xml file Verification help
To help test and debug your .xml file, Video Kiosk has an optional setting you can use to highlight your hotspots on your screen so that you can ensure they are in the correct place and functioning as expected. Remember to turn this feature off before releasing the device to users.
To turn verification mode on
- Go toVideo Kiosk Settings > Overlay > Highlight hotspots and check the checkbox.
To turn verification mode off
Resources
- Video Kiosk uses XML files to store configuration data for a variety of Video Kiosk features. If you’re planning on using XML files with Video Kiosk, please by aware of the file naming conventions by Video Kiosk that change the file extension.
– To edit the XML file, name it using the file extension “.xml”.
– To deploy it with Video Kiosk, add the corresponding Video Kiosk file extension to the end of the filename.
For more information about the valid syntax for each Video Kiosk XML File, refer to the Video Kiosk Users Manual
- Video Kiosk: How to Create an overlay PNG File
- Video Kiosk: How to Create a hotspot overlay XML File
- Video Kiosk: How to Configure an overlay with hotspots