
I recently needed to extract a 30 second video clip, and remove the audio, from a 2 hour mkv video.
Here’s how I did it on macOS, with ffmpeg:
- Download the statically linked pre-compiled binary as a dmg from this page:
https://evermeet.cx/ffmpeg/
The links to the DMG are quite small and appear under the large green buttons that download the .7z files. Look closely. - If the disk image does not automatically mount, double click the downloaded .dmg file to mount the disk image
- Open Applications > Utilities > Terminal
- Enter this command to make sure the /usr/local/bin directory exists:
sudo mkdir /usr/local/bin - Enter this command to install the ffmpeg binary into the correct location (if your version of ffmpeg is different you may need to change 4.0.1 to something else):
sudo cp /Volumes/FFmpeg\ 4.0.1/ffmpeg /usr/local/bin
Now that you have ffmpeg installed, the Terminal command to extract the video using ffmpeg looks like this:
ffmpeg -ss HH:MM:SS.FFF -i movie.mkv -t 00:30 -qscale 0 -an out.mp4
Where HH:MMSS:FFF was the starting time code (in my case it was 2 hours, 8 minutes and 3 seconds or 02:08:03.000 into the video).
The other setting explained:
-i movie.mkv was the input video
-t 00:30 was the duration that I wanted to extract
-qscale 0 was to preserve the video quality
-an was to remove the audio
Of course it being ffmpeg you can use an input movie in a variety of different formats, it just so happened mine was an mkv
Update 2018-09-20
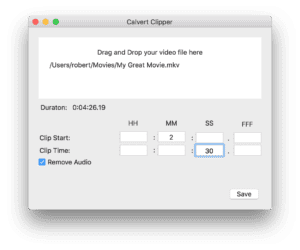
Since making the original post, I have developed a GUI front end to ffmpeg and ffprobe to make the process a lot simpler. You can click on the App name to download the Calvert Clipper.